November 22, 2011

Crayon Quilt Piecing in Progress

I've been working on sewing the strips together for the Teacher's Crayon Quilt.  These are strips that the children selected as being their favorites when I went to the Great American Teach In the other day.
 So far I have the strips sewn and pressed.  All of the prairie points are made for the crayon tips and I've started working on the teacher's pencil.  So far I really like the pencil.  I went with a different pink than the one I'd planned as this one matched a bit better and I knew when I turned the tube I'd made the right choice.  Doesn't that pink scream eraser?

For the quilting I'm going to be quilting the students names onto their strips (hence all those bits of paper at the top of the flimsy).  Currently I'm planning to find the center and mark each strip with my Sewline Pencil and then write in the name with the pencil before quilting it. I am considering using gold glitter thread for quilting the students names.  I've never quilted with glitter thread before, but I think it would unite the crayon colors nicely so it's worth the try.

I don't think I will be working on this much more until after Thanksgiving.  DD was firm well over a month ago that we always host Thanksgiving so hence we will again this year.  What are your plans for Thanksgiving?  I think perhaps the best thing would be to simply sit at the sewing machine and give thanks for finding this passion of quilting in which to bury myself in.  ;-)

November 18, 2011

Peppermint Burst Quilt is Finished!


My Peppermint Burst Quilt


Tiny on the Peppermint Burst Quilt
I just finished tucking in the last of the thread ends, so Peppermint Burst is now officially a finished quilt.  I love the feel of a brand new quilt and I'm clearly not the only one.

Peppermint Burst Shows off its backing
Everyone always wants to tell you how to take a picture of a quilt, and I was worried taking these pictures in the evening but as I spread the quilt out on the couch I knew it would be okay.  Just look how well my quilting pops in the pictures.  When I said densely quilted I really meant it.

I also flipped up the corner so you could see the way all that quilting looks on the back.  As well as a detail pick below.  That with the heart square with the heart quilted into it is 1".  Yes, lots of people have quilted more densely, and that's okay.  This is a cosy quilt, just right for those chill winter nights.
Peppermint Burst Heart Detail
I'd like to offer up a special thanks to my friend Sue who wrote and published Pick Four.  This is my version of her quilt Starburst.  Her directions for making flying geese were easy even for this hardened anti flying geese fanatic.

November 16, 2011

Art From the Heart

Teach In Quilt Strip Layout
Today at the Great American Teach-In, I attempted to show the first grade students in my daughters class, that art is made with our hands, mind, eyes, and hearts.  To take that one step further is to say that because art comes from your heart it is pure and good no matter what it looks like nor what others might think of it.  I think I lost them a little on that point but guess what?  As I'm making a quilt from the strips the children picked I get to reinforce that point when I make the quilt label.

Teach-In Thanks
I am now I'm the proud owner of a Certificate of Appreciation as well as a school mug.  One of these days I'll hang all these letters and so forth up in the sewing room so that I can marvel at them.  The mug was a surprise as I truly didn't expect anything.  I met a fellow quilter while at the school, and we all know it's nice to meet someone that thinks like we do in our travels.  I also met a mom who had met my daughter, currently her daughter is in DD's class last year, believe it or not she proceeded to tell me about my own DD without knowing I'm DD's mom.  How about that.

I am really looking forward to getting started on this quilt.  As a strip quilt I doubt it will take long and it is sure to be fun so I started laying out the children's fabric strips right away.  I wasn't sure about the layout of the fabric, so of fussing over it to long, instead I went to my leftovers pile and looked for a strip that matched what the teacher told me her favorite color is.  She said blues to greens.  Thereby I picked the strip that runs across the bottom of the upper picture to make the applique teacher's pencil and I think that helped pull the colors together.   I think the appliqued pencil will be thicker than that as I plan to make a tube and then applique it on that way running at an angle over the bottom right corner of the quilt.  No one picked grey so that will be good for making the metal that holds a pencil on and I have a pretty pink polka dotted fabric for the eraser.  I'm not sure about a wood color for the sharpened part but I should be able to come up with something and the lead point should be okay too.

November 15, 2011

My Visitor Before the Teach-In

The Great America Teach-In is tomorrow and I think I'm ready.  This is how I envision the strips to come together.  The top will be prairie point binding to give the crayons their points.  I will be adding a fabric to the bottom of the quilt of a currently unknown color and appliqueing a pencil in the teacher's favorite color with her name and the class information on it.  It is sure to be a fun time.  The quilting is my favorite part of this quilt as I will be quilting each child's name onto their selected strip so instead of a traditional crayon label it will be the child's name stitched onto the fabric they liked best tomorrow.
This morning while waiting for the bus to come I spotted a visitor on my neighbor's fence.  I think it was going after a snake the way it danced around on the ground.  This hawk stayed long enough for all of the children at the bus stop to see it and better yet long enough for me to run inside after the bus departed to take these pictures for you.  This is a fully mature red shouldered hawk and likely a year round resident here.  Still it is amazing to see such a powerful hunter so close up.  I'm so glad cameras have zoom!

November 12, 2011

Christmas Quilt-Along November: Evening Wrap Up

Can you work on another quilt?  Those were the words my daughter uttered to me when I came in to call on her Barbie mess, so that she might move it to another room so I could reload the Peppermint Quilt.  Now seeing as she always does everything I ask of her even if I have to ask three times I thought okay, but what else can I do?  That's when I saw Halicha's post in which she made Christmas Tree ornaments.  It sounded like fun and hers were so cute.

I should stop here and say I'm not crafty.  People start talking about glue and scissors and see my birdhouse from sand?  And a part of me freezes over and my eyes glaze.  That's because I'm trying to figure out not only how much I need to pay out to buy the scissors glue and sand but how much I really need to get because I'll have to make it 10 times before it looks half that good.  But I though this would just be a simple bit of sewing and I can do that, right?  Ummm, WRONG.  LOL!
Handmade Ornaments
Firstly I couldn't find a pattern, and then I thought I could wing it.  But I wasn't sure so I started with a 3" square of fabric, and made HSTs of it.  But they looked to big, so I put them back together and made them again.  Now they looked really really way to small, but I was going for small and cute so surely everything was going to be okay. I start sewing them together.  Not to bad, the top part looks okay.   But then came time to cut the backing and deal with the binding.  That's when I discovered my "cute little ornaments" are 2" square.  Not 2.5" but 2" flat.  How in the word do you bind something of that size?

So anyway here they are.  If I bothered to figure out my time on them they would surely be in the top 10 most expensive ornaments in the house. At least they are done and there's no trace over 1/4" scraps left of them to nag me.  
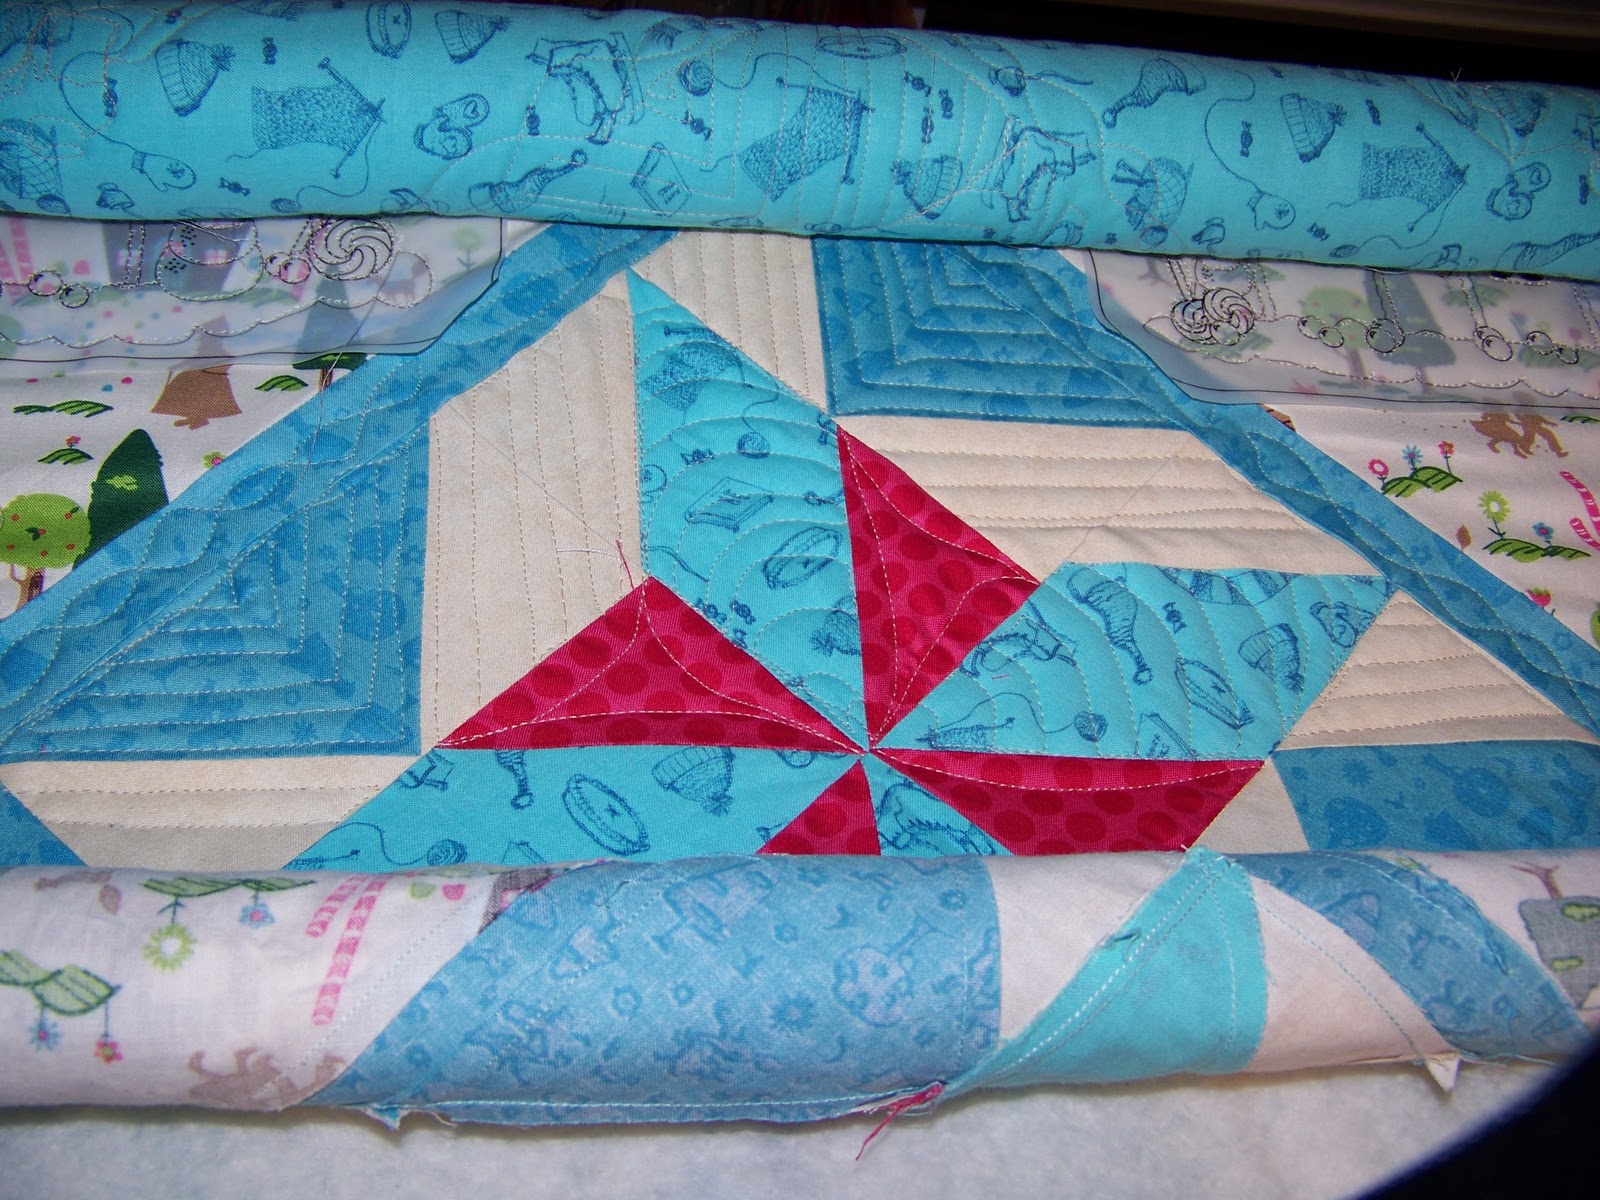
Peppermint Border Quilting
Thankfully around the time I was finishing up the 6th one DD was done and wanted to play on the computer.  Hooray!  So I loaded the Peppermint Quilt back on the frame sideways and set about quilting the side borders.  I made it nearly all the way down the first side when I started having a tension issue.  Rather than deal with it I walked away to make dinner.  That was the perfect choice as I've since realized that when I changed the bobbin the thread much have slipped out of the proper path when I was putting the bobbin case back in.  So now I need to unpick a red stripe.  I started already but the light isn't good enough for that this late at night so I will go back to it tomorrow.  Thanks so much for joining me today, I'm glad to have been able to join you this year and I'm looking forward to a 3rd great year next year.

Now before you go I'd like to thank everyone who stopped by today.  The Peppermint Quilt and I haven't seen eye to eye through it's creation and all of your comments today really helped to bolster my self reflection.  Thank you.

Christmas Quilt-Along November: Lunch Break

I haven't made it back to my quilting.  Walking into the living to load my Peppermint Burst Quilt on the frame for the sounds time took me instead to something that looked a lot like this so I just went back to the sewing room and made binding instead.  It's one less thing I'll need to make later.  What are you having for lunch?  I'm thinking a salad, which is surely the opposite of Christmas but something light and fresh sounds good after my donuts earlier.

Christmas Quilt-Along Year 2: November Morning

Good Morning,

It was cold here early this morning, which always seems to come as a surprise here in Sunny Florida.  So I stayed curled up under my covers until 9 am, when I discovered the chocolate covered donuts my DH had bought as a morning surprise for DD and I. By the time I unloaded a reloaded the dishwasher I didn't want coffee anymore so I made a cup of hot coco.  I'm sure by now everyone is happily quilting away at their sewing machines and I'm the late gal, but that's okay.

Peppermint Burst Quilt
Gingerbread House Detail
Today I'm going to be continuing to quilt on my Peppermint Burst Quilt.  If you haven't been following along this quilt is modified from Sue's Starburst Quilt in her new Pick Four Book.  Today marks the 4th day of quilting on this quilt and you can follow the above Peppermint Burst link if you wanted to see some additional pictures.  Currently I have quilted the entire quilt from top to bottom.  Skipping only the side borders, so this morning I will be putting the quilt back on my mid arm quilting frame turned 90 degrees to quilt the sides in one long line of quilting.  I have four plain blocks which I quilted Gingerbread Houses into, unlike the candycanes and the gingerbread men in the border I did not stipple behind those and I was considering adding some scrolls or hearts above and below the Gingerbread houses as well.  I wont get to close because I want the details to continue to stand out.
Hidden Christmas Tree
As you can see I haven't tucked in my threads but I will get to that.  Have you wondered where Sunny and Tiny are?  All these pictures and no cats?  Well they're right here.  Sunny is so glad I'm awake he's been enjoying a nap on my lap sleeping on his back just like a baby.
My Furry Darlings:  Sunny and Tiny
After more quilting, hopefully I'll be able to get started on binding this quilt, but I don't know if that will happen today.  Sew Happy!


November 10, 2011

Peppermint Burst Quilt: It's in the Details

Hi there!  I feel like I'm peaking out from underneath a rock to say hello.  I've been working on the quilting for my Peppermint Burst Quilt for two days now and I'm about half way done.  The quilting is rather dense on this quilt so the going is slow.  Now instead of looking at the blocks as a whole, I took a tip from Sew'n Wild Oaks.  I've been looking at each piece of the block and how it comes together to create the sort of movement I want to see in the block.  Doing this is proving to be very midarm quilt frame friendly, as I can do part or all of a single pieced bit of fabric and still maintain a movement throughout the block that conforms to my vision instead of fighting with a pattern that is to big for the frame.  Can you see how I have quilted the segments differently?  Of course you can always click on the image to see it more closely.

Now look again?  Do you see that velum paper you see at the top two corners?  That is my attempt to try a technique my friend Vicki uses on her Felines and Fibre Arts Blog.  I found a coloring book page of a gingerbread house that was just divine and I set about quilting on top of the velum to create the quilted image within the quilt.  You will see more of that after I'm finished if all turns out as I hope.

I am also adding my own theory on this quilt.  It involves the borders and came to me while I was quilting another quilt.  You see when you have a midarm quilt frame like I do, your work space is only as big as that area you see in the above picture.  Yes it's as long as the quilt is wide, but what about the side borders?  When I quilt the top and bottom borders everything is one long continuous line of quilting.  Beautiful, but when I work on the side borders I can only work as wide as the bars and quilt allow.  Which is somewhere between 9" and 5" depending on where I am in the quilt and how big it is.  Think about that, would you like to start quilt and then stop and cut the threads, while quilting a border every 5"?  Not to mention what I've been going through to tuck strings ACK!  So it came to me that what if I quilted the top border, then the body of the quilt, and lastly the bottom border simply skipping the side borders for the time being?  What if I finish the quilting and then turn the quilt, putting it back on the frame only this time rotated 90 degrees?  I can then work on the borders right to left just like when I quilted the top and bottom.  I think this idea will work and work well.  DH tells me it will be easier to load the quilt as a nearly finished piece as there will be much less pinning and very little aligning that needs done.  I hope he's right.

Now before I go back under my quilt rock for the rest of the day, tell me what have you been up to?  Something good I hope.

November 08, 2011

Quilting Peppermint Burst Quilt


The Peppermint Burst Quilt and I didn't see eye to eye when I was piecing the border.  I had plenty of seam ripping to do.  So much so that when I was done I simply loaded it onto the quilt frame without taking a picture.    I have started quilting the border.  The pink has a swirled candy cane and the cream colored fabric has a little gingerbread man in each segment of the peppermint twist.  Yes I meandered behind them I couldn't see myself.  The inner border is again swirls which remind me of chocolate carmel drops.

November 02, 2011

Peppermint Burst Quilt 1st border on

I've been steadily working on the Peppermint Burst Quilt.  Today I finished sewing the blocks together and sewed on the first border.  It seems like this quilt is one of those challenges. Thanks to Sue's directions the blocks were easy and all assembly line pieced.  But that sashing?  Goodness Gracious!  First when I thought I was done with the center I discovered I left the sashing off the upper left and lower right blocks of  one row, and then I found a pink square at the edge of the quilt sewn in where it didn't belong.  Thankfully I discovered these when I was taking pictures and was able to fix each thing before moving on, that way I only had a some seam ripping to do and we all know it could have been worse!  The 6" Peppermint border is the next and final border and I think I'll start that tomorrow.